
Free textured crochet stitch patterns
If you are browsing for eye-catching free textured crochet stitch patterns to add incredible depth, warmth, and color-blocking potential to your blankets and scarves, this Textured Checkerboard Wave Stitch is a must-try!
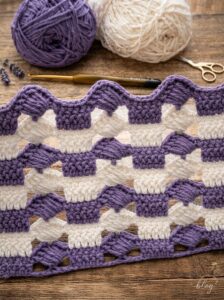
🧶 Materials and Tools Needed
To replicate the exact ocean-wave and winter-white look displayed in our layout image, gather the following supplies:
- Yarn: Worsted weight (#4 / Medium) or DK weight (#3 / Light) cotton or acrylic yarn in two contrasting colors. (Color A: Turquoise Blue, Color B: White).
- Crochet Hook: Size H/8 (5.0 mm) or tailored size to maintain fluffy, loose puff stitches while keeping the solid blocks tidy.
- Tapestry Needle & Scissors: For clean color switches and weaving in loose tails.
📝 Pattern Notes & Abbreviations (US Terms)
To make this guide smooth and perfectly intuitive for global readers, we use standard US shorthand:
- ch: chain
- sc: single crochet
- dc: double crochet
- sp: space
- sk: skip
- st: stitch
- Puff st: puff stitch (Yarn over, insert hook into designated stitch, pull up a tall loop to the height of a dc. Repeat 4 times into the same stitch. You will have 9 loops on your hook. Yarn over, pull through all 9 loops, ch 1 to lock the puff).
Pattern Repeat Gauge:
This stitch pattern is worked in a structural foundation multiple of 12 chains + 2 for the turning chain.
📸 Step-by-Step Textured Wave Stitch Tutorial
Row 1 (Foundation Grid – Using Color A):
- Ch 26 (using a multiple of 12 x 2, plus 2 extra chains for the base setup).
- Sc in the 2nd ch from hook and in the next 5 chains.
[6 sc segment built] - Ch 5, sk 5 chains, sc in the next 6 chains. Repeat from * to * across to the end of the chain row. Turn.
Row 2 (Setting the Solid Block Ridges):
- Ch 1 (does not count as a stitch). Sc in the back loops only (BLO) of the first 6 sc stitches from the previous row.
- Ch 5, sk the open ch-5 space loop from before, sc in the BLO of the next 6 sc stitches. Repeat across the entire row. Turn.
Row 3 (Introducing Color B & Slanted Puff Waves):
- Drop Color A (do not cut, carry it along the side or switch cleanly). Join Color B .
- Ch 3 (counts as 1 dc). Look at the open ch-5 window below: working around both ch-5 strands from rows 1 and 2, work a sequence of 4 slanted Puff stitches , each separated by a ch 1, angling them evenly inside the window grid.
- Sk the solid 6-sc block, and jump directly into the next open window to anchor another set of 4 slanted wave puff stitches. Repeat across. Turn.
Row 4 (Locking the Flowers & Waves):
- Ch 1. Sc across the top of the entire row, placing exactly 1 sc into the top of every puff stitch and every ch-1 space between them, ensuring your stitch count matches the initial foundation structure. Turn.
Row 5 & 6 (Shifting the Checkerboard – Using Color A):
- Pick up Color A again. Now, we reverse the positions to create the brick checkerboard effect.
- Where you had a solid sc block before, you will now work a
ch-5 open window. Where you had the puff wave window, you will work6 solid sc stitchesin the back loops only to create the ribbed checkerboard texture. - Continue alternating rows 2 through 4, swapping your colors every 2 rows to watch the interwoven texture lock together flawlessly!


