Free chevron crochet blanket patterns
If you are browsing the internet for beautiful free chevron crochet blanket patterns to design stunning throws or warm home decor accessories, the classic Chevron Ripple Stitch is the absolute gold standard.
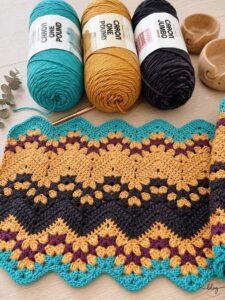
Known for its distinct zigzag peaks and valleys, this pattern creates eye-catching geometric rows that display color shifts beautifully. By using a premium worsted weight yarn—like the Caron One Pound and Caron Jumbo yarns shown in our featured workspace—you can blend soft rose pink, crisp cream, and sage green into a perfectly balanced vintage palette that looks highly professional.
In this comprehensive crochet tutorial, we break down the mechanics of the wave stitch using standard American crochet terms (US notation), ensuring every row feels entirely familiar and fluid for global readers. Grab your hooks, arrange your colors, and let’s grow this gorgeous chevron design together!
🧶 Materials and Tools Needed
To replicate the exact cozy colorway and stitch scale displayed in our layout image, gather the following supplies:
- Yarn: Worsted weight (#4 Medium) premium acrylic yarn. We recommend Caron One Pound or Caron Jumbo for maximum yield and uniform texture.
- Color A: Rose Pink
- Color B: Cream / Off-White
- Color C: Sage Green
- Crochet Hook: Size H/8 (5.0 mm) or Size I/9 (5.5 mm) to ensure a plush, soft drape that is not too rigid.
- Tapestry Needle & Scissors: For clean color transitions at the row ends.
📝 Pattern Notes & Abbreviations (US Terms)
To make this guide smooth and perfectly intuitive for global readers, we are using standard US shorthand:
- ch: chain
- sc: single crochet
- dc: double crochet
- sp: space
- sk: skip
- st: stitch
Pattern Repeat Gauge:
This wave stitch is built in a structural foundation multiple of 12 chains + 3 extra chains for the initial turning chain setup.
📸 Step-by-Step Chevron Ripple Stitch Tutorial
Row 1 (Foundation Setup – Using Color A):
- Ch 27 (or any multiple of 12 x 2, plus 3 extra chains for the base width).
- Work 2 dc in the 4th ch from hook (the skipped chains and these 2 dc form your first 3-dc cluster peak).
- Dc in each of the next 3 chains. Sk the next 2 chains (this forms the low valley floor). Dc in each of the next 3 chains. Work 3 dc directly into the next chain (this forms the high peak cluster).
- Repeat from * to * across to the end of the chain row. Turn.
Row 2 (The Textured Ripple):
- Ch 3 (counts as your first dc). Work 2 dc in the very first stitch base.
- Dc in the next 3 stitches. Skip the 2 stitches sitting at the valley center below. Dc in the next 3 stitches. Work 3 dc directly into the center stitch of the peak cluster from the previous row.
- Repeat this sequence across the entire row. Turn.
Row 3 & 4 (Swapping Your Colors):
- Drop Color A and carry or secure it at the border edge. Join Color B (Cream).
- Repeat the exact stitch instructions from Row 2 . Working the increases at the peaks and the skips at the valleys preserves the mathematical zigue-zague balance forever.
- Change your yarn colors every 2 or 4 rows (switching to Color C, then back to Color A) to watch the beautiful, dense waves lock together flawlessly into a luxury boutique layout!