
Free crochet bucket hat patterns for beginners
If you are scanning the web for trendy free crochet bucket hat patterns to build high-end fashion accessories, capture the summer festival aesthetic, or design viral craft blog content, this Retro Granny Stripe Bucket Hat is an absolute masterpiece.
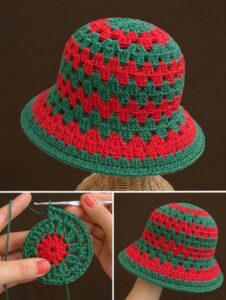
Contemporary street fashion heavily favors textured, nostalgic, and Y2K-inspired silhouettes over basic flat knits. This specific hat design stands out because it combines a clean geometric flat crown with contrasting rows of dense 3-dc Granny Clusters . The result is a beautifully ventilated yet thick-walled sun hat that keeps its shape flawlessly, framed by a rigid, anti-flop brim—making it incredibly attractive to buyers and makers alike.
🧶 Materials and Tools Needed
To reproduce the stunning, crisp forest-green and snow-white look displayed in our featured ateliê layout, prepare the following supplies:
- Yarn: Worsted weight (#4 Medium) premium 100% cotton or structural soft acrylic yarn.
- Color A: Forest Green (Main clusters and brim edges)
- Color B: Crisp White (Contrasting accent stripe lines)
- Crochet Hook: Size H/8 (5.0 mm) to keep the cluster windows tidy while providing enough density for the brim.
- Tapestry Needle & Scissors.
📊 Project Size & Yarn Yield Strategy Guide
Planning an inventory for seasonal retail or structuring high-value content for a craft blog requires precise technical math. Use this structural reference chart to map out your sizing and yarn usage:
| Targeted Hat Size | Intended Head Circumference | Total Crown Diameter | Estimated Yield (Per 100g Skein) |
|---|---|---|---|
| Toddler / Child | Approx. 18 – 20 inches | 5.5 inches flat | 1 Skein Color A + 1 Skein Color B |
| Adult Small / Medium | Approx. 21 – 22.5 inches | 6.5 inches flat | 1 Skein Color A + 1 Skein Color B |
| Adult Large / XL | Approx. 23 – 24 inches | 7.2 inches flat | 2 Skeins Color A + 1 Skein Color B |
📝 Pattern Notes & Abbreviations (US Terms)
- ch: chain
- sl st: slip stitch
- sc: single crochet
- dc: double crochet
- sk: skip
- sp: space
- Granny Cluster: A group of 3 double crochets (3 dc) worked into the exact same open space.
📸 Step-by-Step Granny Stripe Bucket Hat Tutorial
Part 1: The Flat Crown Top (Using Color A)
We start from the center circle working flat increases to form the top cap disc as displayed in the hand panel.
- Round 1: Start with a magic ring. Ch 3 (counts as 1 dc), work 11 dc into the loop. Sl st to the top of the ch-3 to join.
[12 dc] - Round 2: Ch 3, work 1 dc into the exact same base stitch. Work 1 increase (2 dc inside the same space) into every stitch around. Sl st to join.
[24 dc] - Round 3: Ch 3, work 1 dc into the same base stitch, dc in next st. Work 2 dc in next st, 1 dc in next st. Repeat from * to * around the loop. Sl st to join.
[36 dc] - Round 4 (Setting the Grid Windows): Sl st into the hollow space between two stitches. Ch 3, work 2 dc inside that same gap space. Sk 3 stitches, work a Granny Cluster (3 dc) into the next gap space between stitches. Repeat from * around. Sl st to close. Fasten off Color A.
[12 clusters total]
Part 2: The Vertical Stripe Walls (Alternating Colors)
We drop the increases here; working evenly into the gaps forces the fabric downward to form the bucket walls.
- Round 5: Join Color B (White) into any open space between the clusters. Ch 3, work 2 dc in the same space. Work 3 dc into the next open space between clusters. Repeat around. Sl st to join. Fasten off White yarn.
- Rounds 6 – 13: Repeat the Round 5 sequence, alternating between Color A (Green) and Color B (White) every single row. The hat will form beautiful staggered retro stripes that build the structural sides of the bucket hat.
Part 3: The Rigid Anti-Flop Brim (Using Color A)
- Round 14 (Edge Stabilization): Join Color A into any stitch. Ch 1, work 1 solid sc into every single dc stitch and every space around to tighten the rim base.
- Round 15 (The Flare Expansion): Ch 1. Work 5 sc stitches, followed by 1 sc increase (2 sc in the same space). Repeat from * around to flare the brim outward over the brow.
- Rounds 16 – 20: Ch 1. Work 1 sc into the Back Loops Only (BLO) of every stitch around. Working in the back loops creates dense concentric ridges that stiffen the fabric, giving the brim a firm boutique structure that stays upright. Fasten off and weave in ends cleanly.