Free crochet poinsettia pattern
If you are scanning the web for festive free crochet poinsettia pattern ideas to elevate your holiday table settings, embellish winter wreaths, or add a luxury handmade touch to Christmas gift wrapping, this 3D Layered Poinsettia Flower is an absolute showstopper.
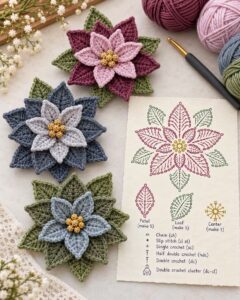
In this pro-level crochet tutorial, we walk you through the entire project using standard American crochet terms (US notation), complete with an exact design dimension scale so you can plan your festive production with precision. Let’s prep our hooks!
🧶 Materials and Tools Needed
To reproduce the stunning, soft-pastel and traditional vibrant Christmas variations shown in our featured design, prepare the following supplies:
- Yarn: Sport weight yarn (#5ply / DK) or Mercerized Cotton thread in a premium blend.
- Color A: Golden Yellow / Mustard (For the textured seed center)
- Color B: Light Pink or Cream (For the inner/smaller petals)
- Color C: Deep Holiday Red or Coral Pink (For the outer/larger petals)
- Color D: Forest Green or Sage Green (For the framing leaves)
- Crochet Hook: Size C/2 (2.5 mm) or D/3 (3.0 mm) to keep your stitches crisp and hold the leaf-tip geometry perfectly.
- Tapestry Needle & Scissors.
📊 Project Size & Yarn Yield Strategy Guide
Planning an inventory for holiday sales or structuring content for an engaged craft audience requires exact technical dimensions. Use this structural reference chart to map out your yarn usage:
| Motif Element | Quantity Needed | Average Finished Size | Estimated Yield (Per 100g Skein) |
|---|---|---|---|
| Complete 3D Flower | 1 Unit (Assembled) | Approx. 4.5 inches across | 6 to 8 Full Layered Flowers |
| Individual Petal / Leaf | 10 Petals + 5 Leaves | Approx. 1.8 inches (each) | 80+ Individual Pieces |
| Textured Cluster Center | 1 Center Ring | Approx. 0.6 inches across | 150+ Mini Core Units |
📝 Pattern Notes & Abbreviations (US Terms)
- ch: chain
- sl st: slip stitch
- sc: single crochet
- hdc: half double crochet
- dc: double crochet
- dc-cl: double crochet cluster (worked together to form a textured bead)
📸 Step-by-Step Layered Poinsettia Stitch Tutorial
Part 1: The Textured Seed Center (Make 1)
Using the Golden Yellow yarn to build the tiny textured core beads shown in the circular diagram.
- Round 1: Start with a magic ring. Ch 1, work 6 sc inside the loop. Sl st to the first sc to join.
- Round 2: Ch 2. In each stitch around, work a 2-dc cluster (dc-cl) separated by a ch 1 to create the raised, bumpy look of natural flower seeds. Sl st to close. Fasten off, leaving a tail for sewing.
[6 textured clusters]
Part 2: The Pointed Poinsettia Petals (Make 5 Small Pink/Cream & 5 Large Red)
Both petal sizes follow the exact foundational geometry of the chart, worked symmetrically on both sides of a center chain axis to create the sharp, leaf-like point.
- Foundation Axis: Ch 9.
- Side 1 (Going Down): Sl st in the 2nd ch from hook, sc in next ch, hdc in next ch, dc in next 3 chs, hdc in next ch, sc in the last ch.
[Do not turn, you will rotate to work along the opposite raw edge of the chain foundation] - The Sharp Tip: Ch 2, sl st in the second chain from hook (this builds the crisp picot-style point at the apex).
- Side 2 (Going Up): Working along the back loops of your starting chain: sc in the first space, hdc in next, dc in next 3 spaces, hdc in next, sc in next, sl st in the last stitch. Fasten off, leaving a long assembly tail.
Part 3: The Veined Green Leaves (Make 5)
Using Forest Green yarn. The leaf uses extended stitches to give it a slightly wider, more dramatic profile than the petals.
- Foundation Axis: Ch 11.
- Side 1: Sl st in 2nd ch from hook, sc in next, hdc in next, dc in next 5 chs, hdc in next, sc in last ch.
- The Leaf Tip: Ch 2, sl st in 2nd ch from hook to form the point.
- Side 2: Mirror the design back up the opposite side of the chain: sc, hdc, 5 dc, hdc, sc, sl st. Fasten off.
🌸 Golden Assembly Formula
- Lay the 5 Large Red Petals in a flat circle, overlapping the bottom bases slightly, and stitch them together using your tapestry needle to form the foundation wheel.
- Layer the 5 Small Pink/Cream Petals directly on top, alternating their positions so they sit beautifully in the gaps between the larger red petals below. Stitch securely.
- Place the 5 Green Leaves underneath the red base layer, positioning them so they peak out symmetrically around the edges.
- Sew the Golden Seed Center right into the hollow middle core, pulling all yarn tails to the back and knotting them cleanly.