
Free filet crochet patterns
If you are scouting the web for timeless free filet crochet patterns to inject a traditional, elegant charm into your festive home decor, this Vintage Filet Crochet Christmas Tree is the ultimate project to add to your seasonal roster.
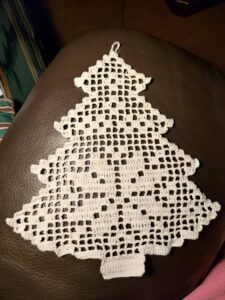
In this comprehensive crochet tutorial, we translate the traditional filet lace chart into clear, written instructions using standard American crochet terms (US notation). Let’s prepare our hooks and dive into the grid!
🧶Materials and Tools Needed
To reproduce the clean, classic heirloom look displayed in our layout image, assemble the following supplies:
- Yarn / Thread: Size 10 Premium Mercerized Cotton Crochet Thread (Classic White, Ecru, or Sage Green colorway).
- Crochet Hook: Size 6 Steel Hook (1.50 mm – 1.75 mm) to guarantee clean, crisp, block definitions that won’t flex or sag under weight.
- Tapestry Needle: Fine size for weaving tails invisibly inside solid mesh blocks.
- Blocking Equipment: Rustproof pins and a foam blocking mat setup.
📊 Project Size & Yarn Yield Strategy Guide
To help you run your handmade business or craft blog with professional accuracy, use this structural reference chart to calculate your inventory based on the thickness of thread you select:
| Project Sizing Style | Average Finished Dimensions | Yarn Consumption Yield |
|---|---|---|
| Holiday Wall Hanging / Ornament | Approx. 8.5 x 11.5 inches | 150 – 200 Yards (Size 10 Thread) |
| Festive Dinner Table Topper | Approx. 12.0 x 16.0 inches | 280 – 320 Yards (Thicker Size 5 Thread) |
| Continuous Tree Door Banner | 3 Repeating Motifs Joined | Approx. 600 Yards total |
📝 Pattern Notes & Abbreviations (US Terms)
Filet crochet is incredibly simple once you know the basic block formulas:
- ch: chain
- sl st: slip stitch
- dc: double crochet
- sk: skip
- Solid Block (Closed Mesh): 3 dc (A block flanking another block consists of 3 dc total per grid space).
- Open Block (Open Mesh): 1 dc, ch 2, skip 2 stitches, 1 dc.
📸 Step-by-Step Filet Crochet Tree Tutorial
Phase 1: The Trunk Base Foundation
- Row 1: Ch 17. Dc in the 4th ch from hook and in each of the remaining 13 chains across. Turn.
[15 dc forming the square trunk foundation block] - Row 2: Ch 3 (counts as 1 dc). Dc in each of the next 14 stitches across. Turn.
[15 dc]
Phase 2: Expanding Into the Bottom Tier Branches (Increases)
- Row 3 (The Branch Flare): To expand dramatically into the wider base of the tree, you will increase the row length by adding chain extensions on both sides. Ch 24 at the start of the row, work dc into the 4th ch from hook, and work open meshes (dc, ch 2, sk 2) and solid meshes to establish the wide bottom silhouette shown in the grid graph. Across the central trunk, work solid blocks. Extend the opposite side by creating foundation double crochets.
Phase 3: Navigating the Filet Graph (The Geometric Light Motif)
To shape the beautiful diamond light motifs inside the pine structure, alternate between open and closed stitches following this rhythm:
- Rows 4 – 15: Always work a solid 3-dc block on the very outer edges of the branch rows to form a sturdy, flat frame. For the open mesh sections (the white spaces in the background), work
1 dc, ch 2, sk 2. To build the inner design, create solid blocks (3 dc together) precisely aligned above the previous row’s open meshes to slowly form the geometric diamonds.
Phase 4: Indenting the Tier Steps (Decreases)
To step inward for the second and third tiers of the tree shape, you must slip stitch across the design:
- The Technique: At the start of a reduction row, sl st across the first 2 open blocks (6 stitches) before chaining 3 to start your first double crochet. Stop working 6 stitches before the end of the previous row. This creates the clean, stepped branch staircase look.
Phase 5: The Star Peak & Hanging Loop
- Row 32 (The Top Peak): Work a narrow 3-block closed mesh at the very top center to form the star point of the tree. Before fastening off, ch 10, loop back and sl st into the base of the same stitch to form a reinforced loop for hanging your finished ornament.
💧 Blocking & Hardening Guide (The Secret to Perfection)
Filet lace can look slightly warped or crumpled right off the hook. To make it display flat exactly like the image, follow this professional step:
Immerse the finished piece in a 1:1 mixture of water and liquid starch (or white glue). Remove any excess by gently squeezing. Pin the piece out, stretched, onto a blocking mat using rustproof pins, pulling the tips of each branch firmly to create perfect zigzag points. Allow it to dry completely for 24 hours before hanging.