
Free hexagon crochet bag pattern
If you are browsing the internet for high-end free hexagon crochet bag pattern ideas to expand your boutique or find your next viral craft project, this Geometric Hexagon Tote Bag is the perfect design to try!
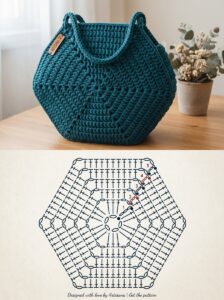
Geometric construction is taking the modern crochet world by storm. This specific purse is ingeniously designed using just two large crochet hexagons that naturally fold and seam together into an ultra-stylish, structured 3D bucket silhouette. Worked in a durable premium cotton yarn or 3mm polyester macrame cord, it holds its shape beautifully while offering plenty of storage space.
To replicate the beautiful, minimalist look displayed in our layout image, gather the following supplies:
- Yarn: 350-400 yards of worsted weight cotton yarn, multi-strand linen yarn, or a 3mm braided polyester cord (Beige/Cream colorway).
- Crochet Hook: Size H/8 (5.0 mm) or tailored size to ensure tight, sturdy stitches that won’t stretch under weight.
- Tapestry Needle: For assembling the panels and weaving in ends cleanly.
- Stitch Markers & Scissors.
📝 Pattern Notes & Abbreviations (US Terms)
To make this step-by-step guide entirely familiar and smooth to read, we are adhering strictly to standard US crochet shorthand:
- ch: chain
- sl st: slip stitch
- sc: single crochet
- dc: double crochet
- sp: space
- sk: skip
- cluster: a group of double crochets sitting between the corner lines.
📸 Step-by-Step Hexagon Panel Pattern (Make 2)
Design Note: This bag requires two identical hexagons. We work in seamless rounds from the center out, creating 6 flat sides separated by 6 distinct chain-1 corner spaces.
Round 1 (The Star Core):
- Form a magic ring (or ch 4 and sl st to the first ch to form a tight circle).
- Ch 3 (counts as your first double crochet). Work 11 dc into the magic ring.
- Sl st to the top of the beginning ch-3 to join the round.
[Total: 12 dc]
Round 2 (Building the 6 Rays):
- Ch 3 (counts as 1 dc). Work 1 dc into the exact same base stitch to form your first pair.
- Ch 1, skip no stitches, work 2 dc into the next stitch.
- Repeat from * around the entire loop. Ch 1, then sl st to the top of the starting ch-3 to close. You will now have 6 distinct clusters separated by open corner gaps.
[Total: 6 clusters of 2-dc / 6 ch-1 spaces]
Round 3 (The Corner Expansion):
- Sl st over to the very first corner ch-1 space.
- Ch 3 (counts as 1 dc), work (1 dc, ch 1, 2 dc) inside that same corner space (this builds your first corner shell crease).
- Work 1 dc between the stitches of the next flat cluster side, then inside the next corner ch-1 space work: (2 dc, ch 1, 2 dc).
- Repeat this sequence around all 6 sides. Sl st to the top of the ch-3 to close.
Rounds 4 through 10 (Sizing Up Your Panels):
- Continue expanding your panels row by row following the natural flow of the chart.
- The Rule: In each of the 6 corner ch-1 spaces around the perimeter, always work
(2 dc, ch 1, 2 dc). Work a regular1 dcinto every single flat side stitch along the straight segments. As the rows grow, the flat sides get longer, creating a perfect geometric star burst pattern. Fasten off after Round 10.
👜 Assembly, Folding, and Continuous Sturdy Handles
1. The Origami Magic Fold:
Lay your two finished crochet hexagons flat on a clean surface. Fold three opposing outer corners of each hexagon inward toward the center. When you align the two folded shapes back-to-back, they will instantly interlock and slide into a gorgeous, deep 3D purse structure.
2. Structural Seaming:
Using your tapestry needle and matching yarn thread, whipstitch or slip-stitch the bottom seams and the side panels together tightly through the back loops only (BLO) . This creates a clean, uniform joint line that reinforces the heavy-duty base of the tote bag.
3. Crafting the Reinforced Straps:
- Attach your yarn directly to one of the top peaks of the assembled purse.
- Ch 50 (or chain the exact length you desire for a shoulder drop), then anchor it securely to the opposite peak on the same side.
- Turn and work 3 solid rows of single crochet (sc) or slip stitches back and forth along the rim and the chain strap. Repeat on the other side. This integrates the handle seamlessly into the body, preventing sagging when the bag is filled with belongings!


