Free crochet tote bag patterns
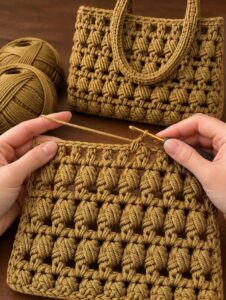
If you are scouting the web for modern free crochet tote bag patterns to build high-end fashion accessories, design trendy market purses, or create viral craft tutorials, this Textured Interlocking Puff Stitch Tote Bag is an absolute masterpiece.
🧶 Materials and Tools Needed
To reproduce the stunning, minimalist sage-green look displayed in our featured ateliê layout, prepare the following supplies:
- Yarn / Cord: 450 – 500 yards of a sturdy 3mm Braided Cotton Cord , Macrame Yarn, or multi-strand chunky t-shirt yarn (Sage Green / Forest Hue).
- Crochet Hook: Size I/9 (5.5 mm) or J/10 (6.0 mm) to pull the bulky loops through easily while keeping the foundation tight.
- Tapestry Needle & Heavy Duty Scissors: For clean row transitions and securing chunky ends.
- Stitch Markers.
📊 Project Size & Yarn Yield Strategy Guide
To run your handmade business or craft blog with professional accuracy, use this structural reference chart to calculate your project sizing and thread consumption:
| Bag Segment | Finished Dimensions | Average Stitch Count | Cord Consumption Yield |
|---|---|---|---|
| Main Body Panel | Approx. 11.5 x 9.5 inches | 14 Rows of Pattern Repeat | 1.5 Full Skeins (approx. 350g) |
| Reinforced Handles | 16 inches long (each) | 4 Continuous Sc Rows | 0.5 Skein (approx. 100g) |
| Complete Purse | Fully Assembled Structure | 3D Rigid Geometry | ~ 2 Full 250m Cord Spools |
📝 Pattern Notes & Abbreviations (US Terms)
- ch: chain
- sl st: slip stitch
- sc: single crochet
- dc: double crochet
- sk: skip
- sp: space
- Puff st: puff stitch (Yarn over, insert hook into designated space, pull up a tall loop to the height of a dc. Repeat 4 times into the same space . You will have 9 loops on your hook. Yarn over, pull through all 9 loops, ch 1 to lock the puff).
📸 Step-by-Step Textured Tote Bag Tutorial
Part 1: The Sturdy Oval Base
We build a solid, flat oval base using single crochets to guarantee the bag won’t sag at the bottom.
- Round 1: Ch 25. Work 3 sc in the 2nd ch from hook. Sc in the next 22 chains. Work 3 sc in the last chain space to loop around. Turn to work along the opposite raw edge of the chain: sc in the next 22 spaces. Sl st to join the round.
[50 sc] - Round 2 (Expansion): Ch 1. Work 2 sc in each of the 3 curve stitches on both ends, and 1 sc in the straight side rows. Sl st to join.
[56 sc] - Round 3: Ch 1. Work 1 sc into the Back Loops Only (BLO) of every stitch around. This creates a crisp, 90-degree ridge that forces the crochet fabric upward to start the walls of the tote.
Part 2: The Interlocking Puff Stitch Walls (Worked in Rounds)
- Round 1 (Foundation Window): Ch 4 (counts as 1 dc + ch 1). Sk 1 st, dc in next st, ch 1. Repeat from * to * around the entire base rim. Sl st to the 3rd ch of the starting ch-4 to close.
- Round 2 (The Puff Row): Sl st into the first open ch-1 window space. Ch 2. Work a 4-loop Puff stitch inside that space, ch 1. Sk the dc stitch, work a Puff stitch into the next open window space, ch 1. Repeat around. Sl st to the top of the first puff to close.
- Round 3 (Reset Grid): Ch 4. Sk the puff stitch, work 1 dc directly into the ch-1 gap between the puffs, ch 1. Repeat around to rebuild the grid windows precisely stacked above the flower-like texture.
- Rounds 4 – 14: Alternate Rounds 2 and 3 sequentially to watch the rich, thick diamond mesh grow upward exactly like the work-in-progress panel in the hands photo.
Part 3: The Integrated Sturdy Handles
- Round 15 (Rim Stabilization): Ch 1. Work 1 solid sc into every single puff head and every ch-1 space around to stiffen the top edge.
- Round 16 (Handle Placement): Sc in the first 10 stitches. Ch 40 (this forms the handle loop), skip 12 stitches along the front wall, anchor back with an sc. Sc in the next 16 stitches across the side. Ch 40 (back handle loop), skip 12 stitches, anchor back with an sc. Sc to the end of the round.
- Rounds 17 – 19: Work 3 solid rows of sc around the entire rim, placing 1 sc into every chain link of the handles. This thickens the straps, making them incredibly strong, comfortable on the shoulder, and integrated directly into the bag body. Fasten off and weave in ends.