
Free granny square crochet patterns
If you are hunting for vibrant free granny square crochet patterns to level up your next blanket, cardigan, or tote bag project, you are going to fall in love with this Gradient Granny Square Variant !
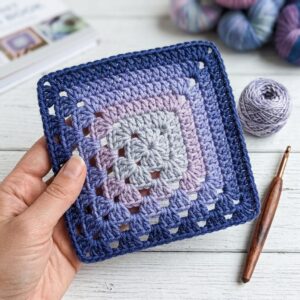
Unlike a traditional, open-mesh classic granny square, this specific design blends a solid, dense center cross with beautifully textured diagonal shell stitch clusters. By transitioning your yarn through a beautifully balanced palette—moving from deep lavender to pastel pink, and framing it all with a sharp magenta border—you get an eye-catching 3D color gradient effect.
🧶 Materials Needed
To duplicate the beautiful gradient colorway shown in our studio layout, assemble the following supplies:
- Medium Weight Yarn (Worsted Weight / #4 / Tex 590): 1 skein each of Lavender, Pastel Pink, and Deep Magenta.
- Crochet Hook: Size G/6 (4.0 mm) or E/4 (3.5 mm) depending on how tight you prefer your stitches.
- Tapestry Needle: For weaving in yarn tails seamlessly.
- Scissors .
📝 Pattern Notes & Abbreviations (US Terms)
To ensure our steps feel entirely familiar to you, we are using standard US notation:
- ch: chain
- sl st: slip stitch
- sc: single crochet
- dc: double crochet
- sp: space
- sk: skip
- shell: a cluster of multiple double crochet stitches worked into the exact same space.
📸 Step-by-Step Gradient Square Tutorial
Round 1: The Lavender Core
- Step 1: Using Lavender yarn , begin with a magic ring (or ch 4 and sl st to the first ch to form a ring).
- Step 2: Ch 3 (counts as your first dc). Work 2 dc into the ring, ch 2.
- Step 3: Work 3 dc into the ring, ch 2. Repeat from * to * two more times. Sl st to the top of the beginning ch-3 to close. You should have 4 separate blocks of 3-dc and 4 corner ch-2 spaces.
Round 2: Extending the Solid Center Cross
- Step 1: Sl st across the top of the next two stitches to reach the first corner ch-2 sp. Ch 3 (counts as 1 dc), work (2 dc, ch 2, 3 dc) all within that corner space.
- Step 2: Ch 1, sk the 3-dc block. In the next corner ch-2 sp, work the corner shell: (3 dc, ch 2, 3 dc). Repeat from * around.
- Step 3: Ch 1, then sl st to the top of the beginning ch-3 to close. Fasten off Lavender yarn.
Round 3: Introducing the Pastel Pink Gradient Layer
- Step 1: Join your Pastel Pink yarn into any corner ch-2 space. Ch 3 (counts as 1 dc), then work (2 dc, ch 2, 3 dc) in that same corner sp.
- Step 2: Ch 1. In the side ch-1 space from the previous round, work a standard side shell: 3 dc. Ch 1.
- Step 3: In the next corner sp, work (3 dc, ch 2, 3 dc). Ch 1, then 3 dc in the side sp, ch 1. Repeat around. Sl st to the beginning ch-3 to close. Turn or continue to Round 4 to expand the pink section as preferred.
Round 4 & 5: Expanding the Shell Grid
- Continue working in an identical manner with your Pink yarn. Every corner ch-2 space receives
(3 dc, ch 2, 3 dc), and every side ch-1 space receives a flat3 dccluster, always separated by a ch-1. Notice how the gradient opens up nicely along the diagonals! Fasten off Pin
Round 6: The Crisp Deep Magenta Border
- Step 1: To give your square that sharp, clean frame, join your Deep Magenta yarn into a corner sp. Ch 3 (counts as 1 dc), work 2 dc, ch 2, 3 dc in the corner.
- Step 2: Work a solid border by placing 1 dc into every single stitch across the straight sides, and placing
(2 dc, ch 2, 2 dc)into the remaining corners. - Step 3: Fasten off and weave in all loose ends cleanly using your tapestry needle. Block your finished square to set the straight edges perfectly!


