Free crochet cowl pattern
If you are hunting for elegant, high-end free crochet cowl patterns to add to your autumn and winter wardrobe, you are going to fall in love with this Vintage Ribbed Neck Warmer with Lace Floral Accent !
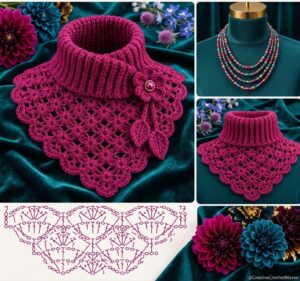
This exquisite piece perfectly bridges the gap between cozy functionality and sophisticated style. It features a dense, elastic ribbed turtleneck that hugs the neck for warmth, flowing beautifully into a delicate, lace-like diamond stitch capelet. To complete the romantic vintage aesthetic, the collar is adorned with a stunning 3D crochet flower embellishment with dangling leaf accents and a pearl center.
In this comprehensive crochet tutorial, we break down the pattern using standard American crochet terms, ensuring every step feels entirely familiar and intuitive for global readers. Grab your favorite neutral yarn, and let’s get stitching!
🧶 Materials Needed
To duplicate the gorgeous, high-end boutique look shown in our studio layout, assemble the following supplies:
- Yarn: Sport weight or DK weight yarn (#3 Light / Tex 350-400) in Cream, Beige, or Ecru. (Approx. 250-300 yards).
- Crochet Hooks:
- Size G/6 (4.0 mm) for the ribbed turtleneck section.
- Size H/8 (5.0 mm) for the lace capelet section to give it a soft, fluid drape.
- Tapestry Needle: For seamless construction and weaving in tails.
- Embellishments: 1 flatback pearl bead or vintage button for the flower center.
- Scissors .
📝 Pattern Notes & Abbreviations (US Terms)
- ch: chain
- sl st: slip stitch
- sc: single crochet
- dc: double crochet
- hdc: half double crochet
- BLO: back loop only (used for the stretchy ribbed look)
- sp: space
- sk: skip
📸 Step-by-Step Cowl & Collar Tutorial
Part 1: The Elastic Ribbed Turtleneck (Worked Flat)
The neck portion is worked sideways in flat rows using BLO stitches to create a knit-like elastic texture, then seamed into a tube.
- Row 1: Using the 4.0 mm hook, ch 31. Hdc in 3rd ch from hook and in each ch across. Turn.
[29 hdc] - Row 2: Ch 2 (does not count as a stitch). Working strictly in the Back Loop Only (BLO) , hdc in each st across. Turn.
[29 hdc] - Rows 3 – 60 (or until it fits comfortably around the neck): Repeat Row 2.
- Assembly: Bring the first row and last row together. Sl st through both layers to form a ribbed collar tube. Do not fasten off.
Part 2: The Delicate Lace Lace Capelet (Worked in Rounds)
Switch to the 5.0 mm hook. We will now work along the bottom raw edge of the ribbed tube to build the star-burst lace stitch shown in the chart layout.
- Round 1: Ch 1, work 1 sc into the edge of every ribbed row around. Sl st to first sc to join. Ensure your total stitch count is a multiple of 6.
- Round 2 (Foundation V-Stitches): Ch 4 (counts as 1 dc + ch 1), dc in same st. Sk 2 sts, work (1 dc, ch 2, 1 dc) in next st to create a V-Stitch, sk 2 sts. Repeat from * around. Sl st to 3rd ch of beginning ch-4 to join.
- Round 3 (The Flower Shells): Sl st into the first V-stitch ch-sp. Ch 3 (counts as 1 dc), work 2 dc, ch 2, 3 dc all in the same V-stitch space. Ch 1, sk the next space, work a cluster shell of (3 dc, ch 2, 3 dc) in the next V-stitch sp. Repeat from * around to create the floral fan bases. Sl st to top of ch-3 to join.
- Rounds 4 – 12 (Expanding the Lace Peak): Follow the stitch diagram by adding chain arches (
ch-3orch-5) between the shells to expand the capelet into a perfect dramatic point over the shoulders. Fasten off and weave in ends.
Part 3: 3D Flower & Leaf Accent
The 3D Flower:
- Round 1: Inside a magic ring, ch 1, work 12 sc. Sl st to join.
- Round 2 (Petal Bases): Ch 3, sk 1 st, sl st in next. Repeat around to create 6 small chain loops.
- Round 3 (The Petals): Into each ch-3 loop, work:
(1 sc, 1 hdc, 3 dc, 1 hdc, 1 sc)to form a rounded petal. Sl st to close. Fasten off, leaving a long tail. Sew a pearl into the center.
The Hanging Leaves (Make 2):
- Ch 10. Sc in 2nd ch from hook, hdc in next, dc in next 4 chs, hdc in next, sc in next, sl st in last ch. Working along the opposite side of the chain foundation to complete the leaf shape: sc, hdc, 4 dc, hdc, sc. Sl st to top. Ch 15 to create the hanging cord.
- Final Touch: Sew the flower and hanging leaves onto the side overlap of the ribbed collar as shown in the layout image.