
How to Crochet the Tulip Stitch: Step-by-Step C2C Tutorial
Learn how to crochet the beautiful tulip stitch pattern step-by-step. Perfect for spring crochet projects, blankets, and shawls. Free crochet pattern included!
If you are looking for free crochet patterns that bring a vibrant, texture-rich look to your projects, learning how to crochet the tulip stitch is an absolute game-changer. This gorgeous floral pattern is highly popular for making spring blankets, decorative shawls, and festive table runners.
In this comprehensive tutorial, we will break down a unique diagonal variant of the crochet tulip stitch pattern . By working corner-to-corner (C2C style) or in diagonal rows, you can create stunning triangular shawls or diamond-shaped blankets featuring realistic, popping tulip buds nestled in leafy green lattices.
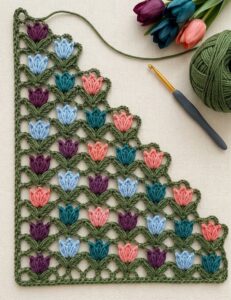
Let’s grab your hooks and dive into this step-by-step crochet tutorial designed to boost your skills and elevate your handmade collection!
Materials Needed for the Tulip Crochet Stitch
To achieve the exact look shown in our crochet studio photo, make sure to collect the following supplies:
- Medium-weight yarn (Worsted or DK weight) in four distinct colors: Sage Green (for the stems/lattice), and vibrant shades like Rose Pink, Sunset Yellow, Bright Red, and Lavender Purple for the tulip buds.
- Crochet Hook: Size H/8 (5.0 mm) or G/6 (4.0 mm) depending on your yarn choice.
- Tapestry needle for weaving in your loose ends.
- Scissors.
Crochet Abbreviations Used (US Terms)
- ch: chain
- sc: single crochet
- dc: double crochet
- st: stitch
- sk: skip
- puff st: puff stitch (used to create the tulip bulb effect)
Step-by-Step Tutorial: The Diagonal Tulip Stitch
Design Note: This pattern is worked by building a green mesh foundation grid first, then dropping back to populate the colorful flower rows using a sequence of clustered puff stitches.
Phase 1: The Green Lattice Foundation (Row 1)
- Foundation: Using the Sage Green yarn, start with a slip knot and chain a multiple of 3 + 1 (if working straight) or begin your corner-to-corner increase. For a straight swatch, ch 22.
- Row 1: Dc in the 4th ch from hook. Ch 2, sk 2 chains, dc in next st. Repeat from * to * until the end of the row. Turn. This creates your open square mesh grid where the tulips will “grow.”
Phase 2: Growing the Tulip Buds (Row 2)
- Switching Colors: Join your Pink, Yellow, or Purple yarn to the first ch-2 space of the green mesh.
- Creating the Tulip Bulb (Puff Stitch): Ch 2, then work a 4-loop Puff Stitch inside the space: (Yarn over, insert hook into space, pull up a loop to the height of the ch-2) repeat 4 times in the same space. You will have 9 loops on your hook. Yarn over and pull through all 9 loops. Ch 1 to secure the puff.
- Transition: Ch 2, sk the next green dc, and work another puff stitch in the following ch-2 space using a different flower color to create the multi-colored garden effect seen in the studio layout.
- Repeat this sequence across the row. Fasten off the flower colors.
Phase 3: The Leaf Lock Row (Row 3)
- Rejoin the Sage Green yarn at the beginning of the row.
- Ch 3 (counts as 1 dc). Work 2 dc in the ch-2 space between the tulip bulbs, then 1 dc directly into the top lock-stitch of the puff stitch. This completely locks the flowers in place and prepares the next foundation grid for the upcoming rows.


