
How to Crochet a Christmas Bell: Step-by-Step Guide and Ideas for Selling
Suggested meta-description: Learn how to make Christmas crafts step-by-step with this complete tutorial for a crocheted Christmas bell. Earn extra income with Christmas decor ideas you can sell!
If you want to learn how to create Christmas crafts step-by-step—whether to decorate your own home or to earn some extra income by selling Christmas decor—this crocheted Christmas bell tutorial is the perfect project to get you started!
Handmade crocheted Christmas ornaments are among the most sought-after and highly valued items during the holiday season. They bring a warm, sentimental touch to a Christmas tree and also make excellent handmade party favors or gifts.
Below, we’ve provided a practical, adapted pattern for creating a beautiful, three-dimensional ornament inspired by vintage Christmas style. Get your hooks ready and follow along with our complete guide!
Materials for Your Christmas Craft
To make this crocheted Christmas tree ornament, you will need a few simple, easy-to-find materials:
• Cotton crochet yarn (medium weight/Tex 295) in traditional colors: Off-white (ecru), green, and red.
• A compatible crochet hook (2.5 mm is recommended; it’s ideal for keeping the stitches tight and firm).
• A tapestry needle for weaving in ends discreetly.
• Homemade crochet stiffener (a classic 1:1 mixture of water and white school glue).
• 1 mini pearl or white bead to serve as the clapper at the bottom.
• 1 white button or a small appliqué for the center of the bow. Step-by-Step: Simple Crochet Christmas Bell Pattern
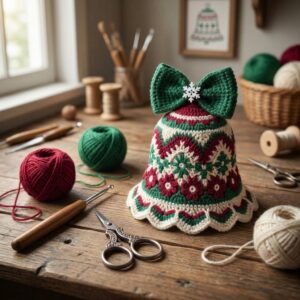
Technical note: We will close each round with a slip stitch (sl st) and begin the next with chain stitches to ensure a uniform transition.
• Round 1: Using ecru-colored yarn, start with a magic ring. Chain 3 (counts as the first double crochet) and work 11 more double crochets (dc) into the ring. Join with a slip stitch into the first stitch. [Total: 12 dc]
• Round 2: Chain 3. Work an increase (2 double crochets in the same stitch) into each stitch from the previous round. Join with a slip stitch. [Total: 24 dc]
• Round 3: Switch to red yarn. To create a color transition and add texture, work this entire round into the back loops only (BLO technique). Work a sequence of 1 single crochet (sc) followed by an increase (2 sc in the same stitch). Repeat around and join with a slip stitch. [Total: 36 sc]
• Rounds 4–8 (Bell Body): Alternate between green and ecru yarn every two rounds to create a classic Christmas-striped look. Work straight rounds, placing one stitch into each stitch from the previous round (you may use either double crochet or single crochet, depending on your preferred texture), while shaping the bell into a cone.
• Round 9 (Scalloped Edge): Using ecru yarn, create a ruffled border: work 1 single crochet (sc), skip 1 stitch, work 5 double crochets into the next stitch (a “shell” stitch), then skip 1 stitch. Repeat this sequence all the way around the edge. Fasten off neatly using a tapestry needle. How to Make the Top Crochet Bow
1. Using green yarn, crochet a foundation chain of 25 stitches.
2. Work 5 straight rows of double crochet (dc) stitches over this chain to create a small, rectangular crochet strip. Fasten off.
3. Fold both ends of the strip toward the center and sew them in place. Take a piece of red yarn and wrap it tightly around the middle of the rectangle to gather the fabric and form a bow.
4. Sew a small decorative button right in the center of the bow, and attach it securely to the top of your Christmas bell.
Pro Tip: How to Stiffen Crochet for Christmas Decorations
To ensure your handmade Christmas bell holds its shape and stays firm on a tree branch—just like in the studio photos—the secret is stiffening.
Dip the finished crochet piece into a mixture of water and white craft glue (gently squeezing out any excess). Place the damp bell over a conical mold—such as a disposable cup or an empty thread spool wrapped in plastic wrap to prevent sticking. Let it dry in the sun for 24 to 48 hours. Once it is completely rigid, remove it from the mold and attach the top bow!
Selling Handmade Christmas Decorations: How to Set Prices?
If your goal is to profit from handmade Christmas crafts, focus on producing sets of 3 or 6 bells. Since the amount of yarn required is minimal (you can even use leftover scraps), the profit margin for this type of handmade Christmas ornament often exceeds 200%. Present them in kraft paper boxes decorated with straw or raffia to impress your customers with a professional look!
PDF : crochet_christmas_bell_tutorial


